This article explains basic navigation in the Facility Information Module of SIMS. See the SIMS User Guide for other instructional SIMS articles.
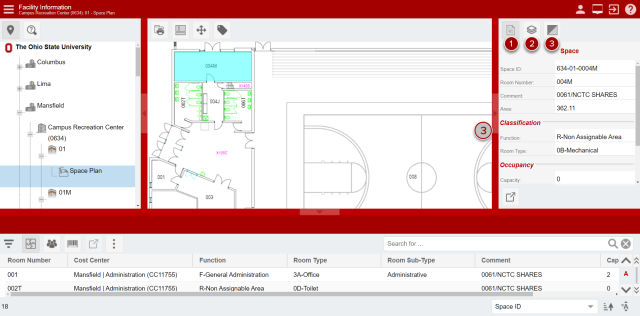
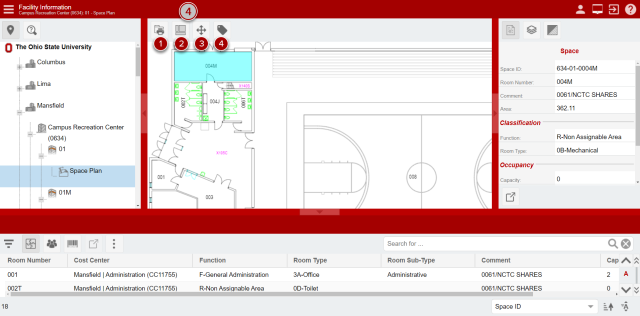
There are 4 key areas surrounding the drawing viewer in the Facility Information module including the following:
Please note that, when a user logs in for the first time, the panels are all collapsed. There is a small red shaded rectangle with a red arrow inside on the side and bottom borders of the page. Click on those to expand the respective panel.
1. Navigation Pane
The vertical pane on the left side of the screen is the navigation pane, highlighted by the grey circled number (

) on the following image.

If the pane is not expanded, click on the red shaded arrow near the middle of the vertical side to expand the pane. For more information on looking at floor plans in SIMS, see the Viewing Building Floor Plans in SIMS article.
Following are different ways to navigate to floor plans, highlighted by red circled numbers (

) on the image above.
- Use navigation tree to find the building floor you’d like to view. Click on the +/- icons to expand and collapse, respectively. Click on the words “Space Plan” on the floor you’re interested in to view the plan.
- Use the search tab to find the floor you’d like to view. In the search field, type in a portion of the name of the building you’re interested in, preferably distinctive, then click the search icon or hit enter on your keyboard. Click on the words “Space Plan” on the floor you’re interested in to view the plan.
2. Data Grid Pane
The horizontal pane at the bottom of the screen is the data grid, highlighted by the by the grey circled number on the following image.

If the pane is not expanded, click on the red shaded arrow near the middle of the bottom to expand the pane. Use this pane as you would the space module space tab as outlined in Navigating the Space Module in SIMS. Keep in mind that the list in the Data Grid Pane is limited to the spaces shown in the selected drawing. To view information in the Data Grid pane, a floor plan needs to be selected to view as described in the Navigation Pane section.
3. Information Pane
The vertical pane on the right side of the screen is the information pane, highlighted by the by the grey circled number on the following image.
If the pane is not expanded, click on the red shaded arrow near the middle of the vertical side to expand the pane. To view information in following steps, a floor plan needs to be selected to view as described in the Navigation Pane section.
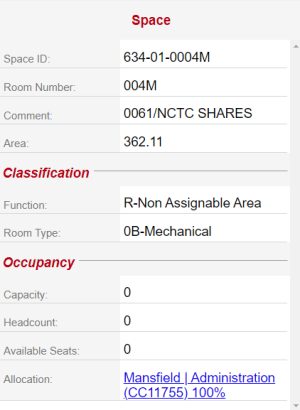
Information Tab – When a room is selected on the plan, the information tab will display in the pane about the selected room. If multiple rooms are selected, shared information and combined square footage will be visible.
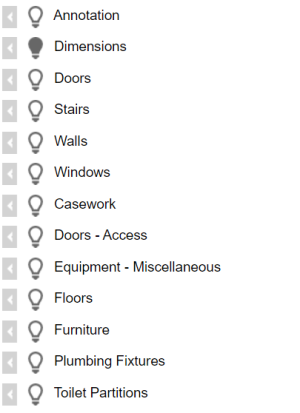
- Layers Tab – Used to hide layers showing in the floor plan, such as casework or room numbers.
- To show or hide layers, click on the light bulb icon next to the layer.
A light-filled light bulb icon (

) means the layer is visible in the drawing viewer.
A dark-filled light bulb icon (

) means the layer is not visible in the drawing viewer.
To isolate a specific layer, click on the left arrowhead icon (

) next to the layer. Click the arrowhead icon again to de-isolate the layer.
- To show or hide layers, click on the light bulb icon next to the layer.
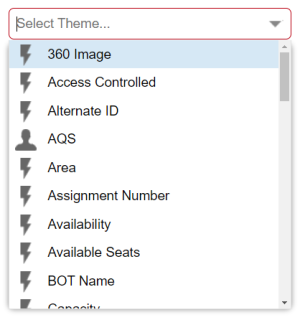
Themes Tab – Used to color code drawings on select data attributes associated with spaces, such as room type or cost center. For more information on basic themes, see the Building Floor Plans Color-Coded with Themes article. For instruction on building custom themes, see the Creating Custom Themed Floor Plans in SIMS article.
4. Drawing Menu
The Drawing Menu is a group of icons located above the upper left corner of the drawing viewer, highlighted by the by the grey circled number on the following image.
If the some of the labels are greyed out, select a floor plan to view as described in the Navigation Pane section.
- File Options – Used to download views, such as using Get Reports to print building floor plans with themes.
- Work Space – An alternative way to expand and collapse the Navigation, Data, and Information Panes.
- Drawing Tools – Used to switch between pointer actions, such as zoom, pan, and select.
- Labels – Used to add labels overlayed on floor plans. For more information on labels, see the Creating and Managing Labels in SIMS article.