Architectural Services Assistant - Update Process
Find the Smartsheet tasks assigned to you
- You have a report of your tasks called [Your Name] Active Tasks Report. There will be links to all our task reports from the Architectural Services Dashboard.
- The highest priority tasks will be marked with a red exclamation point in the Priority column. You should work on these first.
- If you have high and medium or low priority tasks on the same building, do all of the tasks for that building at once, unless we tell you otherwise.
- If you have multiple tasks of the same priority, look for ones that have the SLA Applies box checked. These should be the next priority.
- If there are multiple SLA Applies tasks with the same priority, look for the ones with the highest SLA days, because these will be getting closest to their deadline.
- Change status to In Progress when you begin working on request.
- Let Rachel or Tiffany know if you are running low on tasks.
Determine if field verification will be required
- Discuss with Rachel or Tiffany if you aren't sure, or if you don't know who to contact.
- If field verification is required, reach out to the contact to find out whether all rooms you need access to are usually unlocked during the workday, or whether you need to set up a time for someone to let you in. If the rooms are usually open, you can just let the contact know you will drop by during business hours.
- Let the contact know that you are updating floor plans, so you will need to take photographs and perhaps do some measurements and sketches.
- If you need to schedule a time to meet, offer several days/times when you are able to go there. Most likely, the contact's schedule will be busier than yours, so try to give them a variety of options. If you have another field verification in a nearby building already scheduled, you might tell them that you could meet on X, Y, or Z, but your preference would be when you will already be in that area at whatever day/time. They might not be able to meet you then, but if they can, it could save you some walking.
- Make sure to determine where you will meet.
- Provide your cell number so they could contact you if something comes up last minute.
- It is usually best to reach out to contacts early. They may not be able to meet for a couple of weeks, so knowing that can help you plan out your workload.
- Copy Tiffany on ALL emails you send to contacts outside of FITS. This lets me know what you are working on, and it makes it easier to know who to talk to if something needs to be rescheduled because you call in sick.
- If you don't get a response back from a contact, wait 4 or 5 days and email them again. If you still don't hear back, let Rachel or Tiffany know, and we will try to find an alternate contact.
Complete the field verification (when required)
- Let the occupants of a room know you plan to take photos. That will give them the chance to either get out of the way, or inform you that they don't want you to take photos. If it is a sensitive area, just do sketches instead.
- In the medical center, it is ok to take photos with staff in them, but do not take photos of patients or guests. Sometimes you can just block one side of the camera to only capture a staff area, but if that is not possible, just rely on sketches instead.
- Check room signs for all rooms that have changes. Though not required, it wouldn't hurt to check signs on the adjacent rooms also.
Organize your photos and sketches back at the office
- Make a subfolder for the building in K:\AP\FITS\Architectural\Architectural Services\_Your Name
- You don't need to rename all the photos, but you may if it would help you.
- You can save any reference dwg or pdf files from the SS task to this folder also.
- Do not delete your sketches, notes or photos!
If you are making updates based on drawings only, without field verification
- Model with as much accuracy as we have available. For example, if the only drawing we have is a plan, you may need to guess how tall a window is. However, if we have a whole set of pdf drawings, you should look for elevations and/or a window schedule to ensure the window will be the accurate size and height.
Make the model updates
- Edit the cloud model in BIM 360. Sync to Central regularly!
- If you need to make a new type/size of a family, make sure to Edit Type and then DUPLICATE and RENAME the new type to correspond to the new type/size.
- Make sure to change the visibility (or apply a different view template) so all the components show up; do not work in the Export Default view template.
- You may need to unpin items to edit them. Be sure to pin/repin any levels, grids, floors, roofs or structural columns before you close out.
- Unless the update is very simple, if we have a dwg file, you should link it into the model. Align the plan based on the column grid if there is one, even if that means the surrounding walls don't line up perfectly.
- Include the component types listed in BIMSwitch 8.2.1 and 8.2.4.
- When the room boundary has changed OR the room number has changed, even if the room boundary is the same, we need to delete the room from the model. After deleting the room from the plan view, delete the room from the Room Audit Data schedule at the top of the schedule under Unplaced. Then place a new room and tag in the plan.
- If there are new unsigned rooms that need new room numbers, or >=4 workstations in the same area, submit a request through the Room Numbering Intake Form.
Double check your work
- Accuracy and completeness are more important than speed. We want you to work efficiently, but this isn't a race.
- Re-read the Smartsheet request to make sure you addressed all the updates mentioned.
- Look at the plan with the Working view template applied to check that nothing is missing, as well as the Export All template to make sure the drawing is legible.
- If you added or deleted any rooms, check the Room Audit Data schedule.
- If any cells in the Unbounded Height column are colored in, check to make sure the room heights make sense.
- Make sure all rooms have "-" in the Name column. To update this, select all rooms in the model and update the Name field under Identity Data on the Properties panel.
- If any rooms that you deleted show up at the top of the schedule as Unplaced, select those rows in the schedule and delete them.
- Scan through to make sure no rooms have Redundant or Not Enclosed in the area column.
Finalize the update
- If you linked in a dwg or pdf as a reference, leave the file linked we can look at it when we check over the update.
- Run the Sub-Space Tool and the Space ID tool from the Add-Ins tab. Don't ignore errors if they pop up.
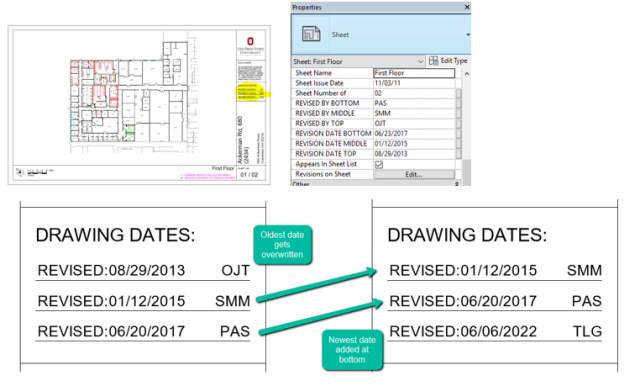
- Add your initials and the date to the title blocks for the floors you changed. If all three revision lines already have dates, you will need to copy the older dates to the lines above and add your initials and date to the bottom line.
- In Smartsheet, use the Add a Comment field to give a brief description of what you deleted, added or revised. If you added new rooms, please list the new room numbers if they aren't spelled out elsewhere in the request.
- Change the status of that task to Ready to Process.
- Move the photos you took to the subfolder of the appropriate floor level in K:\AP\FITS\_Floor Plans\[## Campus]\[Building (####)]\Building Photos.